Pages

Sunday, September 6, 2009

Snippets of the past

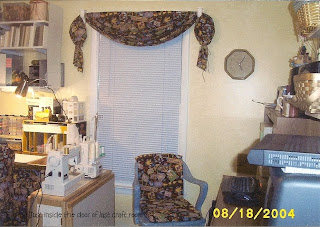
I thought I'd share some pictures of the craft room that I loved and enjoyed for the last five years and the transformation that I gave to it after moving into my new little yellow craft house.
This may be more than you wanted to know about my craft rooms.. but some folks wanted to see it.

The first photo was made from standing just inside the door. I really had a lot packed into this 10x12 bedroom. Now that I've moved out of it I realize I was a queen at organization because I had things packed away in all sorts of places. The television (lower right in photo) was sitting on top of a night stand that had four drawers full of stuff. geeze...
In the second photo I stood on something to make a view from above of the table that Scarlett and I shared as we stamped. She sat at one paper tablet and I sat at the other. I eventually removed the work station (at left on table in photo). It was a great thing to use but it was taking up table space. So I tucked it away for a long time and recently gave it to a dear friend who is making her own craft room. I hope she enjoys it as much as I did. (Hey Jo!)
Photo 3 just shows the table skirt and the chair covers that I threw together using my serger for the most part. I didn't even hem the skirts, just serged the edges. It worked wonderfully and I did the same process in my new craft house too. Quick... and easy. I stored (and still do) a lot of rolling carts behind those curtains. Believe it or not I even know what's behind the curtains.

Next photo shows a little closer shot of the work table. I just recently covered the paper holder (right hand side of table.. looking pitiful) with Mary Engelbreit fabric and it looks so cute! The little green cabinet in the corner was painted green with "milk paint". It was kinda weird but looked rustic like I wanted it too. I painted the sunflowers (one of my favorite) on the front for a little decoration. I still love to paint... but I flip-flop around with doing different things. Mostly stamping though.

Last photo is just another view from the door. You can see the shelves on the walls that I loved and they held a lot of stuff. It was hard to put them up since I used a lag bolt type thingie that was recommended to use with the shelf system. Needless to say, after I got the bolts into the wall studs they didn't want to come out. Oh me.... it was a nightmare. I had to cut the heads off the bolts, then cut the bolts off at the wall surface to get the things down. Then I had to use Sheetrock compound to resurface the walls. Four walls had shelves. It took me two months because it was a horrible job. I only put two sets of the shelves back into my new craft house because it was so bad before. PHEW... I'm through whining now...


I hope you've enjoyed this little snippet of the past. It's been fun to look back on it because it was also a dream come true to me. Many happy hours were spent in that room.
Stay tuned to the next blog post for a look at the makeover this room recently went through.
If you've read this far, I just want to says thanks so much!
I hope you have a great Labor Day!
Take care!
Debbie

Sunday, August 30, 2009

Craft Room wall decor

This is something I made on my Cricut Expression a few weeks ago. The vase is about 9 inches tall and the flowers are 5" or 6" at the widest point. The butterfly looks more like a dragonfly to me, but I love them both so it didn't matter. I've got it all attached to the wall with poster putty. I made the black dots with a 1/2" hole punch and they're also attached with poster putty. I just can't bring myself to add more holes to the walls. I know eventually I'll nail something up, but I'm not ready right now.
If you can see the little X O N that's real small, it stands for hugs and kisses Nanny. My granddaughter calls me Nanny and this was a gift, along with a couple of Mary Engelbreit mini tea pots, from her and my daughter-in-law many years ago . They're little resin letters by Mary Engelbreit. Sooo cute and I love them so much! And... they're attached with poster putty too. (Can you tell I like the stuff?)
I'll be making more things with my Cricut to hang on the walls. Next thing will be words or sayings. Maybe one that reminds me to blog more often would help.
I hope you have enjoyed this little Snippet of a post today and I sure hope you're having a great weekend!
Take care! Thanks so much for stopping by!
Debbie

Anniversary Card

I made this quick card for my hubby for our anniversary that's tomorrow. He'll be out of town so I gave it to him today (Sunday.) He walked into the craft house while I was putting it in an envelope so I told him it was "hot off the press." I went ahead and gave it to him and he proceeded to sit down at the computer and make a card for me. He did use card stock and Hallmark software that he loves to use for his cards. (He does like to save a buck here and there.) Any hoooo... I don't care where the card comes from as long as we are together. We went to grab a bite for lunch and we did a little reflecting on how blessed our years together have been (13 married, 16 together.) We took turns naming the blessing and wonderful times we have had together as a family. He said he wouldn't want to be anywhere else. um... except for maybe the golf course I'm thinking :-)
I think my picture may be on the fuzzy side, but I did color on the stamp (Stampin'UP!) and then stamped it on watercolor paper (SU!). Then I did a little blending with an aqua painter. I used Ranger Distress Inks (Sunday Intl.) around all edges of paper. The tag is from an old Basic Grey scrapbook pack that had been lost in the crafting jungle for ages and I was so happy when I found it yesterday along with a bunch of other stuff I had been missing. Whoo-hoo... it was just like going shopping without spending the money. (Maybe I should start hiding things from myself and find it later...NAH!) The card base is actually a natural kraft stock but it doesn't look it in the picture. Hope you like it.

Have a great evening and thanks so much for stopping by!

Debbie

Monday, August 3, 2009

Dream Craft House Updated Door

A couple of weeks ago I decided to paint the door on my craft house green. The doors on our home are the same green, but on this one I decided to leave the panels at the bottom, and the window trim, white. I think it looks so cute and really sets off the house. What do you think?
It took me forever to decide if I wanted the door green or not. I was wanting clean lines but I wasn't crazy about the white door. I already had scuff marks from moving in. Now I'm glad I went with the decision to paint it green.

I also wanted you to see just how close my craft house is to our house. It's an easy hop out our back door to go to the crafty zone. I just need to remember to turn on the outdoor light on our house because I forget and stay way past dark crafting and one time couldn't see to get back to the house without feeling my way. Geeze...

Now... what do you think about my shelves? My builder didn't make it back to build my shelves so I bought these utility metal shelves. I had been wanting to check them out and I'm glad I have them now. They are 14.5" deep and hold up to 350 pounds of distributed weight. I'm sure I can overload them in a heartbeat! The baskets on top are old and so far they are empty. The funky little shelving in the middle is something my husband found in the trash at a store and brought home to me many years ago. It was a rack that held merchandise that had slotted holes that went onto each prong. (For lack of knowing what tha heck you call them.) The plastic baskets came from the Dollar Tree and they just sit on the 'prongs' to hold tons of stuff. I used to have this rack in the closet of my old craft room and believe me I had that baby loaded down. I did notice one of the welds had broken at the bottom. I think I'll be kinder to it now and not load it down so much. Hum.... what to save....hoard? I mean.. I've got what... six bucks in it. I just love it and couldn't part with it. I've got the red fabric covers held up with binder clips and curtain hooks. I didn't finish the edges because I'm not sure I like all the red. I may go to unbleached sheeting and see how I like that.

Now you see the rest of the story. The shelves are holding a lot of the things that were in the closet and on shelves of my old craft room. I've still got some things missing. (Going crazy looking for them too.) More recycling is here. My hubby picked up these whopper sized onion crates at a grocery store. They are strong and slide out like a drawer. They have a cute printed label on the ends that say "Oso Sweet" with a mountain scene. You may be able to click for a larger view. I just love these crates. I also have two under the computer table. I've got them flipped over so I can sit things on them until I can figure out some other type of storage. I love recycling or re-purposing things so crates have been a staple in my craft rooms for many years. I have four cantaloupe crates serving as shelves sitting under a window now. (Next to the fabric file cabinet.) I don't think my organizing is very "organized" but it's a work in process.

We'll see how it goes. I like the shelves covered, but I like easy access too.
Well... I know I'm a lazy blogger but I just do whatever I feel like doing. I am spoiled ya know!I've got lots more to share but it's time to stamp while I have the energy. (I could use some chocolate about right now!)
Better go before my computer freezes up. (Happens all the time now.)
Thanks so much for stopping by!
Have a great day!
Debbie

Saturday, July 4, 2009

June projects for Sunday International

Tis is my fruit card. You can't see it in the photo, but all the little fruits are cut individually and attached with pop-dots for added dimension. Second photo, is a simple recipe card. I made several to include in the Red Recipe Card holder box.
Third and fourth photos are the Red Recipe Card holder box that I made.


Hey bloggers!

Can you believe it's July 4th? Where did the first of this year go? I know it's been a blur to me.

June was a whirlwind of activities for us. My dream craft house came true and I've been enjoying getting it organized. Far from being done, but it's coming along.

So... let me know what you think about my projects.

Have a great evening and thanks so much for visiting!

Debbie

Happy 4th of July

I've been having so much fun in my new Craft House. I can't focus too well because I'm still in shock and awe that I have it.

We're having an easy, laid-back kind of day today. We cooked on the grill last night with Scarlett helping. Today... we'll eat leftovers.

Today turned out to be a great day to me. I bumped into some friends at Wal-Mart that I used to work with. (Hey Waneda and Bruce!) I could have talked to them all day. They had wandered into my neck of the woods and I just couldn't believe it when I saw Waneda. She was always a joy to work with. That's the sad part of leaving a company that you spent 26 years at. Your friends. Cherished memories...Sharing our lives with each other. Waneda and I shared a lot of crafty things together. She's a fabulous painter and can create some cool things. (Girl.... I sure do miss our chats about crafts!)

Bruce.... helped me to create this hugh stash of paper that I have. (Thanks Bruce for being there when I wanted paper cut to size.) I still have a ton of paper from the old days. A stamper can never have too much paper.

As always, thanks so much for visiting.

Take care,
Debbie

Monday, June 29, 2009

Dream Craft House Inside Update

See the cute flowers in the old rusty milk can. I've had that milk can for maybe 20 years. It's so heavy, it's hard to move around. Yeah... check out that cable wire going across the front. The cable guy came today and ran that line to hook up my computer. I love having the computer in the craft house now.

I hope you're ready for a visit inside my craft house. I've been busy making curtains today and hanging them on the curtain rods that took me forever to put up. I'm getting pretty good at using a cordless drill.
Here ya go... come on it and see what I've done today. This is the computer center just to the left of the entrance. The red skirt is what I made yesterday.
This is just a different view of the computer center. My Cricut Expression is on the left of the table. I wanted it close to the computer so I can use the Design software that can be used with the Cricut. (That's a whole other story.) Let's put it this way.... I don't know how to use it very well, but I'm learning.Next picture is just panning from the left on around the room. The metal file cabinet was a great find for $20 at the Habitat for Humanity Re-Store. The antique sewing machine is from a friend who is another 'great find.' (Thanks Deirdre!)
This wonderful spot is my fun zone! There's the $30 desk from the Re-Store. This is Scarlett's fun zone. She's got a bunch of beautiful cards to hang on her bulletin board. She doesn't know the refrigerator is in here. It's a gift from some dear friends. It's holding some bottled water for now. (Thanks Jim and Rita!)
Okay.. I've taken you in a full circle around the room. What do you think about it? Don't you think it's just a cool creative space? I know I'm ready to start stamping. How do you like that skirt around the center work table? Can you see the little curtain rods that hold the skirts? They were just about $3 each.
Okay... one more view. This is from my desk looking at the television and the door. (Yep... I really hung that television up myself.) No easy task but I figured it out.
Now... what do you think of my wonky curtains? There was no sewing involved. I was just too tired to sew anything else. It's about three yards just draped over the rod. Looks okay to me. I bought way too much red fabric so I thought this would be a good way to use it up.

I sure hope you've enjoyed the tour. The next journey has just begun. I feel my mojo calling out.... it's saying "It's crafting time!"
Thanks so much to everyone that has shown an interest in my journey. Stay with me and you'll see what happens next.
Thanks for visiting and have a great night!
Debbie