Pages

Saturday, December 12, 2009

My Day 12 of Tim's 12 tags of Christmas

What a cutie! This was the most difficult of the 12 tags for me to make. The roses were a challenge. I have to thank Tim for that because had I not followed his blog I wouldn't have tried making roses. I love how they turned out. I didn't have any grunge paper but I used two different card stocks. One was thicker than the other, but they worked equally well. I didn't have enough of the "blingie" gemstones to make the flourishes that I needed, so I used Stickles glitter glue and made little dots. I hope you can see them in the photo.
This was such a fun challenge for me. I think I'll now try to follow some other blog challenges to stretch my brain out of it's comfort zone. Woo-hoo!

If you've been following along with me I sure do appreciate it and I hope you've enjoyed it too.

I'm off to make a Birthday card for a friend and then out to dinner in her honor.
Have a great evening!

Friday, December 11, 2009

Day 11 tag of Tim's 12 tags of Christmas

Yeah!! I'm on the home stretch with my tags. This one was the easiest so far and I hope the one for tomorrow won't be too difficult for me. Woo-hoo!
I cut the cute deer our of white card stock and cut a 'shadow' from red card stock. I embossed the white deer with black flourishes then inked it up with red distressing ink from Ranger.
I stamped some very small images then colored and punched them out with a 1/2" circle punch. The I glued the image behind a clear stone that sort of magnified the image a little bit. Then the stones are glued in the middle of each Prima flower that I colored with my Copics.

I hope you are enjoying this journey with me. Thanks so much for stopping by.

Have a great weekend! I'm off to watch Harry Potter with hubby and granddaughter.

nite!
Debbie

Thursday, December 10, 2009

My Day 10 of Tim's 12 tags of Christmas

WOW! This one was a doozie! I just love it though. I was able to use a lot of my Copic markers on this tag. It also has heavy duty aluminum foil on it. I didn't have the things that Tim used, so as usual, I had to improvise. How cool is that?
I had to stamp each letter on some of Tim's grungeboard that I found at Hobby Lobby. I used my 40% off coupon and picked up a package of plain grungeboard sheets. It's a very thick flexible chipboard type material. It's sort of like a rubbery chipboard material. I had to cut each letter out with an X-acto knife. It took me about 45 minutes to stamp and cut each one out. Tim used die-cut grungeboard letters, but I improvised. I know he doesn't like to use a craft knife but I enjoy using one. I glued the letters to the tag, then glued the aluminum foil on top of all the letters on the tag. I had to gently smooth out the foil around each letter using a round end of a wooden stick thingie I have. (I have no idea what it's originally used for.) Then I colored each section with a Copic marker. I used a black one to trace around each letter for an antiqued look. I just stamped a snowflake and cut it with my knife. I glitterfied the snowflake but it's wet right now, so it probably doesn't show up well.
I think the tag turned out pretty cute. What do you think?

Well... I'm super tired and ready to call it a night. I sure do appreciate you stopping by my blog to see what I'm up too.

Have a great night and Happy Friday tomorrow!

Debbie

Wednesday, December 9, 2009

My Day 9 tag of Tim's 12 tags of Christmas

This tag just touches my heart. That's my granddaughter 10 years ago. I still call her 'baby-girl'. She'll never be too old for me to call her that. I love this picture of her. She loves Christmas so much. She loved Frosty very much at the time. She had to hug him everyday and talk to him. So sweet and precious! I treasure the memories.
So.. I guess you can tell I love this tag. It may not be just like Tim's but the idea is the same.
How sweet. I colored the metal items with my Copic marker. The film strip was one that I cut up. The little pictures are from Tim's Web-site. He gave us permission to use them. He has a film strip ribbon available for purchase, but I had to improvise. (It's been like a treasure hunt to see if I could find something in my craft house to use for my substitutions.)
Let me know what you think about my sweet little tag for day 9. Thanks again for stopping by my little blog.

Take care and have a great evening.

Debbie

Tuesday, December 8, 2009

Our cat...Mr. Whiskers

Mr. Whiskers came to live with us in September. He dropped by one day and wouldn't leave. So, we decided to keep him and took him to the vet and spent a small fortune to get him healthy and neutered. Poor baby has a right front paw that had been broken at some time in his little life (he's about one-year-old) that causes him to hold that leg up when he walks or runs. The doctor said it would never be better, but gave him a cortisone shot. We have since moved him into the house. Not exactly what we wanted to do, but we've fallen in love with him and treat him like a little kid. He's got it made. He lets us know when he wants to go out and guard the yard. He just sits around looking at everything, then he comes back in.
He doesn't bother the tree...but I did leave off the ornaments from the very bottom of the tree just in case.
He's getting fat and has gotten very frisky since his surgery in October. We thought it'd slow him down, but geeze... he likes to play hard and sleep hard. He makes this chirping sound (for lack of knowing what to call this sound) instead of meowing. It's so funny! He only meows when he wants to come back in the house from being cold. Cracks me up.
I thought I'd share the picture I made this morning of him under the tree. He was smelling of the presents but so far hasn't had much interest in them or the tree. He'd rather play with a little stuffed toy or my granddaughter's dirty sock.
So if you come visit us, you may have to walk over a dirty sock or a playful cat. He will grab your feet if he's wanting to play.
Do you have any idea what the 'chirping' sound is? I don't know how to explain it, it's not a purr, but this little sound from the inside. Crazy...

Gotta go now.... thanks so much for dropping by. Hope you are enjoying my 12 tags of Christmas. I think I'm going to make a display board to put them on. I better get on that tomorrow. Maybe I'll share it here.

Have a great evening!

Debbie

My Day 8 tag of Tim's 12 tags of Christmas

Phew! I just finished cooking and eating the most wonderful pork chops. Yum-O! I'm not usually crazy about pork chops, but these turned out so tender. I marinated them with Italian dressing and cooked them on my griddle. Very good....


Okay... here's my Day 8 tag. Isn't it cute? I cut the lamp post on my Cricut Expression using white cardstock. I colored it with my Copic markers. Used a Martha Stewart punch for the greenery on the lamp post. The bells are stamped and I either had these very little ones or some that were just too big. The large key is an Angel Company stamp image colored with a gold marker. I attached a key charm to the larger key with a little brad. I used a piece of sheet music layered under the stamped images. I made the little red bow on the lamp post with my Bow Easy.


Let me know what you think about this tag and thanks so much for stopping by.

Take care,

Debbie

Monday, December 7, 2009

My Day 7 tag of Tim's 12 tags of Christmas

This is my day 7 tag of Tim's 12 tags of Christmas. Visit his blog here to see what it's all about. I know you've seen this Santa before, but he's so cute and the only vintage-looking one I have. It's hard to see the little metal tag in the picture, but it has "wish" debossed in the middle. It started out as a silver tag and I colored it with my Copic markers. It's cute, but just doesn't show up well in the picture.
Let me know what you think about my version of Tim's tags. I've made it this far so hopefully I'll make it to the last tag. woo-hoo!
I've had a super busy day so I'm off to rest a little. (My desk looks like a tornado hit it.) It's been a fun tornado though.
Thanks so much for stopping by and I hope you have a great evening!

Debbie

Sunday, December 6, 2009

My Day 6 tag of Tim's 12 tags of Christmas

This is my Day 6 tag of Tim's 12 tags of Christmas. I must admit it was the easiest one so far for me. Visit his Web site here to see what it's all about.
I cut the tree out of green cardstock on my Cricut Expression and added some Aleene's glitter snow. The truck was printed from a graphics software package on my computer. I printed it on cardstock and colored the white areas of the truck with a gold marker. There's a red button added where the spare tire is located. (At least I think it was the spare tire.) I stamped the "Merry Christmas" and the flourish. The background is a page from an old book. I glued it down then tore the edges. I used Ranger Distress inks around the edges of the tag and also in the middle of the tag.
The metal charm was silver so I colored it with a dark brown Copic marker. It's attached to the ribbon with a little brass safety pin.
The tree is wrapped with twine to the top of the truck. The tree and truck are attached to the tag with foam dots.
This one was easy-peasy!
Let me know what you think about my tags so far. Sometime before Christmas... I've got to finish my Christmas cards.
Thanks so much for visiting my blog. I hope you'll take the time to leave a little comment.

Have a great evening!

Debbie

Saturday, December 5, 2009

My Day 5 tag of Tim's 12 tags of Christmas

Now this tag was a little more of a challenge than the others. It took me a while to figure out how I was going to create the ornaments.

I used clear acrylic and punched out the shape I needed on the first three ornaments (from left to right) then the one on the right is actually a rubber stamped image. I stamped my images on white cardstock then used Crystal Laquer to glue down the acrylic piece on top of the stamped piece. Then I stamped the top of the ornaments and cut them out and glued in place.

I couldn't find any of my wire to use to 'hang' the ornaments so I used embroidery floss. I think it looks okay. I discovered I don't own any green embossing powders (how did that happen?) except for the teal green I used for the pine boughs I stamped and embossed. No problem... I'm fairly happy with it. Everything else just fell in place after I finished the ornaments.

I cut the word 'greetings' out with my Cricut Expression. Now that is one gizmo that I've really enjoyed since receiving it last Christmas. There's just no end to what you can do with it.

Let me know what you think of my tags. I'm just excited that I've made it this far.

It's been fun and I've lost track of time as I've spent my day in my little Craft House. If I had put a bathroom in here when we built it... I'd never have to go in the 'big' house. (Well... I would have to go get snacks.)

I do hope you are enjoying following along with me on the 12 tags of Christmas project. Visit Tim's Web site here. The more comments he receives, the more prizes he will give away. I'm trying my best to win something.

Thanks so much for stopping by. Let me know if you like my tags.

take care,

Debbie

My Day 4 tag of Tim's 12 tags of Christmas

So here's my Day 4 tag of Tim Holtz 12 tags of Christmas. How do you like it? It wasn't as hard as I was expecting. I had to do some serious substituting for things Tim used that I didn't have.
That's been the fun part of this project to me. Going through my 'stash' of goodies and seeing what I haven't looked at in a while.
I used an assortment of different stamps for the background. On some of the stamps I just colored in the portion with markers that I wanted to use. Isn't that neat? I've always heard of doing that, I just never tried it. It makes you look at your stamps in a whole new way.
The large pin holding the framed wreath was bright silver before I colored it with my Copic markers (after I did some sanding on it.) I wanted to take away the shine of the silver so I could get a dull bronze finish. Maybe it looks okay. The little star was a silver charm and I also colored it with a Copic marker. Gotta love those alcohol markers. Just give it a few minutes and it's dry.
Hang in there with me... I've got tag 5 coming up next. WOO-HOO!

As always, I really appreciate you taking the time to stop by and visiting my blog.

Have a great evening!

Debbie

Thursday, December 3, 2009

My "Day 3 Tag" for Tim Holtz 12 Tags of Christmas


Oh my goodness! I've made it to day 3 of Tim Holtz 12 Tags of Christmas. I'm not so sure about my tags for today's project but I did what I could with what I had.


Let me know what you think about my 'plaid' tags for day 3.


We're off to see Scarlett singing in a Christmas Choir program. She loves to sing and we love to hear her belting it out.


Have a great evening and thanks so much for stopping by.


Debbie

Wednesday, December 2, 2009

My Day 1 and 2 of Tim Holtz 12 Tags of Christmas

This is a first for me. I don't usually follow along on any of the challenges I see on-line (too lazy) but I just love the tags Tim makes at Christmas. So... I'm going to try and follow along and make one each day.
I made the first one yesterday but the tag was wet last night and I was too tired to make a picture.
I'm substituting when I don't have the same products Tim uses. (I just gotta order some of his goodies.) I have some, but not everything he uses. No matter... it's fun to see what I can come up with.
So let me know what you think about my tags.
The Snowman tag is my DAY 1 tag.....
The Christmas tag is my DAY 2 tag......

Do you think I can do it? Life keeps me busy but I'm going to give it a try. Hang on to your keyboard... it may get crazy. (I haven't even finished my Christmas cards yet.)

Thanks so much for stopping by and let's see how I do with this cool project.

Please visit Tim's blog here and leave a comment. The more comments he receives the more prizes he'll give away. How fun is that!
Oh... and I'd love for you to leave a little love for me on my blog...maybe it'd encourage me to blog more often.

Have a great Thursday!

Debbie


Sunday, October 4, 2009

World Card Making Day

I finished these two cards up yesterday. I colored the cherry image, from Flourishes http://www.flourishes.org/, with my Copic markers. They have the best clear stamps I've ever used. They came right out of the package ready to use. I didn't have to clean or prep the stamps. They really are the best clear stamps I think I've ever used. I'm in love with them. I bought several sets from them recently and can't put them away. I used designer scrapbook paper for the background and the sentiment is an old Penny Black image. I added Crystal Lacquer to the cherries and layered one leaf and one cherry for added dimension. I added the bow to look like it was tied onto the bunch of cherries.
The peach image is also from Flourishes. Another great set. Both the cherries and peach set have small and large images that can be used in a lot of different ways. The images are added to the cards with Pop-dots to raise them up.

Let me know if you have any questions about either one of these cards. Do you think they look good?
Thanks so much for taking the time to visit my little blog. I really do appreciate it.
Have a great day!


Sunday International projects for September

The little gift box was cut using my Cricut Expressions die cut machine and the Tags, Bags, Boxes and More cartridge. I used the new Borders 2 ATC stamp set, from the Best of Dee Gruenig Collection, using bleach (our technique for Sept.) onto the dark wine card stock. Isn't that a neat look? I added the little scalloped square (cut on Cricut using Accents Essentials cartridge) on the bottom of the box. Added pink brads to the corners and attached the Prima flowers on the top flap with a pink brad also.
Easy to make and cute to look at.

What do you think about the little gift box? On the Zebra card, I was trying to make my own background paper so I stamped the Zebra from the Jr. Jungle ATC stamp set, from the Best of Dee Gruenig Collection, repeated across the white panel. Then attached it to red, then onto a black card base. The oval pieces were cut on the Cricut. The sentiment is from the new Greetings 2 ATC set from the Best of Dee Gruenig Collection.I love Dee's stamp designs. She is so talented and it's so much fun to watch her demonstrate how to stamp. You'll just have to go to the Sunday International Web site and see the new videos Dee has created of her using the new ATC stamp sets.


I used to watch Dee on the Carol Duval Show on HGTV. Anytime Dee was on there it was a fun show. Her ideas are so great also and you can tell she loves to share the art. I have some of her video's and now DVDs to try and learn her techniques. She's uber talented.


I used the Borders 2 ATC set to stamp this background and used a sentiment from the Greetings 2 ATC set. I think it turned out kinda cute. It has started me on a quest to design my own backgrounds using some of my smaller ATC stamps.

Do you like the look?This is the inside. Super easy. Using the same pink card stock as on the front I stamped my images in brown.


The bookmark was made using the Jr. Jungle ATC set and stamping with bleach onto the dark wine colored card stock. It's so fun to watch the stock change colors. Different card stock yields a different color when stamped with bleach. You never know what you'll end up with. The bookmark was cut on the Cricut Express using the Tags, Bags, Boxes and More cartridge. I cut two and layered them together. I used a gold Krylon marker to go around the edges of the wine colored bookmark... then added the gold ribbon. Now...if I'd just put the bookmark to good use and read a book. It's been a while since I read a book but I hope to read one while on vacation during Fall break. Can't wait either.


Well... what do you think about my projects for Sunday International?
It truly has been a thrill to design for them. If you ever have the chance to design for someone, go ahead and give it a try. It will challenge you to learn new things and add a twist to some old things you may have forgotten.
I hope you've enjoyed your visit with me today and I sure do appreciate you stopping by.
Take care and have a great evening!
Debbie

Sunday, September 27, 2009

A rose is a rose


This rose just bloomed overnight on a little bush Scarlett and I planted in the pouring rain the first week of August. We were soaking wet but had a wonderful day! I bought two rose bushes... 2 for $10 at Lowe's. I don't have a green thumb at all so I have no idea how these things will survive. We'll see how it goes. This particular rose bush hadn't been looking too good while the other one has had a lot of blooms on it. I can't think of the name of them right now, but I don't think they're suppose to grow tall.
Isn't it just beautiful! I took the picture early this morning as I headed to the craft house with my cup of coffee.
I don't know what the other bush with red leaves is. We bought it when we got the rose bushes. It's beautiful but didn't have a tag on it and the checkout clerk at Lowe's didn't know what it was. It was coming a rainstorm while we were there so I didn't wait around to find someone that may know what it is. Do you have any idea what it may be?

Enjoy the view. (Hey... I've been stamping a lot... but my mojo has been on vacation and my ideas aren't flowing like I want them to.) geeze... sometimes it works, sometimes it doesn't.

Right now I have a roast with potatoes in the crockpot and I made homemade chicken noodle soup last night. It was wonderful. I hope the roast will be as good. Oh... I better go pop some green beans on the stove to cook while I try to find my mojo.

Don't you just love food! (And... I made homemade chocolate pudding a couple of hours ago. Over-cooked it I think but it's still good.)

Have a great Sunday evening and thank you so much for stopping by. Let me know if you're enjoying my blog.

take care,

Debbie

New family member


We never expected to have any pets at our home. We used to be away from home most of the day and my husband isn't crazy about cats. But... we have a cat now. It took up at our house last weekend and decided to stay with us. He's a cutie and I think he's young but I'm not sure.
My granddaughter fell in love with him and immediately wanted us to go buy cat food and a flea collar, so we did. He's a very laid-back kitty and just lays around sleeping or looking through the door wanting some attention.
We've decided it he wants to stay he'll be well cared for. I won't let him in the house though so I know he may decide to run away. Who knows? So far he's hanging around our home for now.
Let me know what you think about Mr. Whiskers. He's a super sweet kitty. My husband even talks to him and feeds him. (This is what I should have made pictures of... cuz I never figured it would happen in my lifetime.)
Take care and thanks so much for stopping by.

Debbie

My First Column

Talk about nervous! That's how I felt when asked to join in on the new 'crafty' column for the newspaper I work for (http://www.annistonstar.com/). Just type in my name in the search box and it'll take you right to it. I love crafting so I thought I'd give it a try. My love of crafting tools was the source for my first column and I hope you enjoy it. I've included a picture of the lap quilt and the "gizmo" at the end of the article.

Haute Homemade: The gizmo queen's favorite gadget
by Debbie Reaves Community Editor
12 hrs ago 23 views 0 0
Once upon a time, my friends called me the "Gizmo Queen." That's because I have an undying love for gizmos. Not the kitchen kind (even though I have a few), but the crafty kind.Some of my gizmos collect a little dust, but others are always within reach of my crafting zone. The new AccuQuilt Go! Fabric Cutter is one of the ones I keep handy.I first came across an ad for the fabric cutter while thumbing through the fall issue of Quilts and More magazine. There it was! A gizmo I had never seen before!The ad stated it was a revolutionary way to cut fabric fast, accurately and easily. No mistakes.I needed more information, so I ran to my computer and went to the Web site. Oh no … it was the last day of a special sale they were running on the fabric cutter. I had to grab my purse and close the deal. (I mean, they were giving away things for free with the purchase of the fabric cutter … I just had to go for it, right?)It was a good thing I'd been saving money for awhile, as it cost $349.I had a tiny bit of buyer's remorse, but I got over it. I do love gizmos, you know.A week later I had my newest toy. It turned out to be the nicest thing for cutting out fabric shapes to use in quilting.I don't claim to be a quilter; I made my first one last year. I am fascinated by the art of quilting. But I found it very hard, and cutting out the fabric was time consuming.This new gizmo makes the cutting easy. Pick a die with the shapes you want, place the fabric on the die — up to six layers at once — place the plastic mat on top and roll it through the cutter. In a matter of seconds you have your pieces cut and ready to use.It was wonderful! I starched and ironed my fabric scraps ahead of time, and then starting rolling them through the fabric cutter. In less than an hour, I had 90 4 ½-inch squares and 90 2 ½-inch squares.It was easier for me to cut four layers of fabric at a time. The crank got a little tough to turn with six. But it's worth it.I made a lap quilt with 90 squares in about two hours after cutting the fabric pieces. It was fun, and I can't wait to get more dies.A die with three different shapes came with the fabric cutter. My special also included eight free quilt patterns for different projects. Other dies are available at http://www.accuquilt.com/.You can shop around on the Internet and find bargains on the cutter with free shipping. That will come in handy as it weighs about 20 pounds. It's a sturdy piece of equipment that even came with a dust cover.Now that's my kind of gizmo.

Welcome to "Haute Handmade," a new column for crafters. Our two main columnists: Deirdre Long, the Star's Escapes editor, has been sewing for about 15 years, since she was 10 years old. She also knits, crochets and upcycles old items by redesigning them into new creations. Debbie Reaves, the Star's Community editor, has been sewing for 40 years. She was also a sign-painter for 18 years, and crafts with all things paper, from rubber stamps to scrapbooking.


This last photo is the die as it goes through the AccuQuilt GO!
I hope you like my first column and I hope you'll leave a comment here or on the newspaper Web site directly under the column.

As always... I appreciate you taking the time to visit my blog.

Have a great day!

Debbie

Monday, September 14, 2009

Cricut Craziness

The whole reason I started my blog was because I fell in love with the Cricut Expression. Crazy huh? Just go back to the beginning and see my posts about this cool contraption! It does some pretty neat things. Mine has been lonesome lately with me playing with other toys. But a girl's gotta do what a girl's gotta do! I'll be back with my Cricut any day now. Cuz... I've got ideas that need to be put to the test. You'll see.....

Any hoooo.... Cricut is celebrating having 100 cartridges available by giving away 100 cartridges over the next five weeks. (20 per week.) This information is from their newsletter that I receive and always read. Naturally I did what I had to do to get in on the action. One of the things to get my name in the hat twice was add this link on my blog. How easy is that? So... here it it. It goes back to the cartridge product page at Cricut. Whoo-Hoo! If you're wondering just what the Cricut is all about... have a visit on their Web site. Cool machine! Did I tell ya I just love mine?


http://www.cricut.com/shopping/ProductDetails.aspx?id=361&s=1&sc=2

Have a great evening!

OH... I did make something this weekend. No pic yet. It was a patchwork lap blanket. I'll share it with you later and tell you what toy I used to help speed the process along.

Nite now!

Debbie

Sunday, September 6, 2009

Snippets of the present

Now... take a look at my sweet little "old craft room." This is a view from the door. As you can see.. the walls don't have much on them. I can't bring myself to make new nail holes. Scarlett and I did hang a painting she made just for the room. It's hanging to the left above the side of the bed. She was so sweet and enjoyed painting it so much!
The antique Singer sewing machine (circa 1927) is a precious gift my mother gave me last year. My father refinished it back in the '70s. He had it sewing like a dream. It still has the belt on it that my dad bought for it. It's just stretched out and I haven't taken the time to buy another one. The machine is in beautiful shape and would sew (I think) if I just replaced the belt. (Project for another day.) Just to the right in the photo is a side view of another treasure my mother gave me. It was my grandmother's dresser/make-up stand. My mother has had it for only a few years and she knew I loved it. She surprised me by giving it to me last year. Both items hold a special place in my heart and now in my home.
I was looking for a peaceful design. I usually go for 'real country' but this time it's a mild version of something... I don't really know what it is.

The sweet dresser has a very heavy slab of marble on the top. It's not attached... it just sits there. It's just beautiful. The mirror has cardboard on the back and is still in pretty good shape. My mother thinks it's from the 1950's but she's not sure.
The bed is new and sure looks dark in the photo. It is a sleigh bed with an Espresso color finish on it. The bedding is dark brown micro suede type fabric. I just love to touch it. geeze.... The sheets have a khaki, light and dark tan and blue design it them. They look so good with the brown comforter. I found the blue pillow at Wal-Mart and it matched the design on the sheets. The curtains match better in person than they do in the picture but I guess that's life. I didn't make them. They were cute and I was tired. (That's life too!)

I did just make the curtains for the closet. Made them too short so I went back and added a dark brown fabric panel to the bottom. I also did this cool zig-zag stitch across both panels that mimics what is on the comforter. It sorta goes in a wave shape but you can't tell it in the photo. Geeze... (that's life too!)


Okay... hubby is hungry for lunch so I guess that's my call to 'feed my man.' He's good to this old gal... guess I better throw some burgers on the grill.
Hope you enjoyed the snippets of the past and present. How do you think I did on the walls?
Thanks again for hanging in there with me on such a long post.
have a great day too!
Debbie

Snippets of the past

I thought I'd share some pictures of the craft room that I loved and enjoyed for the last five years and the transformation that I gave to it after moving into my new little yellow craft house.
This may be more than you wanted to know about my craft rooms.. but some folks wanted to see it.

The first photo was made from standing just inside the door. I really had a lot packed into this 10x12 bedroom. Now that I've moved out of it I realize I was a queen at organization because I had things packed away in all sorts of places. The television (lower right in photo) was sitting on top of a night stand that had four drawers full of stuff. geeze...

In the second photo I stood on something to make a view from above of the table that Scarlett and I shared as we stamped. She sat at one paper tablet and I sat at the other. I eventually removed the work station (at left on table in photo). It was a great thing to use but it was taking up table space. So I tucked it away for a long time and recently gave it to a dear friend who is making her own craft room. I hope she enjoys it as much as I did. (Hey Jo!)
Photo 3 just shows the table skirt and the chair covers that I threw together using my serger for the most part. I didn't even hem the skirts, just serged the edges. It worked wonderfully and I did the same process in my new craft house too. Quick... and easy. I stored (and still do) a lot of rolling carts behind those curtains. Believe it or not I even know what's behind the curtains.

Next photo shows a little closer shot of the work table. I just recently covered the paper holder (right hand side of table.. looking pitiful) with Mary Engelbreit fabric and it looks so cute! The little green cabinet in the corner was painted green with "milk paint". It was kinda weird but looked rustic like I wanted it too. I painted the sunflowers (one of my favorite) on the front for a little decoration. I still love to paint... but I flip-flop around with doing different things. Mostly stamping though.

Last photo is just another view from the door. You can see the shelves on the walls that I loved and they held a lot of stuff. It was hard to put them up since I used a lag bolt type thingie that was recommended to use with the shelf system. Needless to say, after I got the bolts into the wall studs they didn't want to come out. Oh me.... it was a nightmare. I had to cut the heads off the bolts, then cut the bolts off at the wall surface to get the things down. Then I had to use Sheetrock compound to resurface the walls. Four walls had shelves. It took me two months because it was a horrible job. I only put two sets of the shelves back into my new craft house because it was so bad before. PHEW... I'm through whining now...


I hope you've enjoyed this little snippet of the past. It's been fun to look back on it because it was also a dream come true to me. Many happy hours were spent in that room.
Stay tuned to the next blog post for a look at the makeover this room recently went through.
If you've read this far, I just want to says thanks so much!
I hope you have a great Labor Day!
Take care!
Debbie

Sunday, August 30, 2009

Craft Room wall decor

This is something I made on my Cricut Expression a few weeks ago. The vase is about 9 inches tall and the flowers are 5" or 6" at the widest point. The butterfly looks more like a dragonfly to me, but I love them both so it didn't matter. I've got it all attached to the wall with poster putty. I made the black dots with a 1/2" hole punch and they're also attached with poster putty. I just can't bring myself to add more holes to the walls. I know eventually I'll nail something up, but I'm not ready right now.
If you can see the little X O N that's real small, it stands for hugs and kisses Nanny. My granddaughter calls me Nanny and this was a gift, along with a couple of Mary Engelbreit mini tea pots, from her and my daughter-in-law many years ago . They're little resin letters by Mary Engelbreit. Sooo cute and I love them so much! And... they're attached with poster putty too. (Can you tell I like the stuff?)
I'll be making more things with my Cricut to hang on the walls. Next thing will be words or sayings. Maybe one that reminds me to blog more often would help.
I hope you have enjoyed this little Snippet of a post today and I sure hope you're having a great weekend!
Take care! Thanks so much for stopping by!
Debbie

Anniversary Card

I made this quick card for my hubby for our anniversary that's tomorrow. He'll be out of town so I gave it to him today (Sunday.) He walked into the craft house while I was putting it in an envelope so I told him it was "hot off the press." I went ahead and gave it to him and he proceeded to sit down at the computer and make a card for me. He did use card stock and Hallmark software that he loves to use for his cards. (He does like to save a buck here and there.) Any hoooo... I don't care where the card comes from as long as we are together. We went to grab a bite for lunch and we did a little reflecting on how blessed our years together have been (13 married, 16 together.) We took turns naming the blessing and wonderful times we have had together as a family. He said he wouldn't want to be anywhere else. um... except for maybe the golf course I'm thinking :-)
I think my picture may be on the fuzzy side, but I did color on the stamp (Stampin'UP!) and then stamped it on watercolor paper (SU!). Then I did a little blending with an aqua painter. I used Ranger Distress Inks (Sunday Intl.) around all edges of paper. The tag is from an old Basic Grey scrapbook pack that had been lost in the crafting jungle for ages and I was so happy when I found it yesterday along with a bunch of other stuff I had been missing. Whoo-hoo... it was just like going shopping without spending the money. (Maybe I should start hiding things from myself and find it later...NAH!) The card base is actually a natural kraft stock but it doesn't look it in the picture. Hope you like it.

Have a great evening and thanks so much for stopping by!

Debbie

Monday, August 3, 2009

Dream Craft House Updated Door

A couple of weeks ago I decided to paint the door on my craft house green. The doors on our home are the same green, but on this one I decided to leave the panels at the bottom, and the window trim, white. I think it looks so cute and really sets off the house. What do you think?
It took me forever to decide if I wanted the door green or not. I was wanting clean lines but I wasn't crazy about the white door. I already had scuff marks from moving in. Now I'm glad I went with the decision to paint it green.

I also wanted you to see just how close my craft house is to our house. It's an easy hop out our back door to go to the crafty zone. I just need to remember to turn on the outdoor light on our house because I forget and stay way past dark crafting and one time couldn't see to get back to the house without feeling my way. Geeze...

Now... what do you think about my shelves? My builder didn't make it back to build my shelves so I bought these utility metal shelves. I had been wanting to check them out and I'm glad I have them now. They are 14.5" deep and hold up to 350 pounds of distributed weight. I'm sure I can overload them in a heartbeat! The baskets on top are old and so far they are empty. The funky little shelving in the middle is something my husband found in the trash at a store and brought home to me many years ago. It was a rack that held merchandise that had slotted holes that went onto each prong. (For lack of knowing what tha heck you call them.) The plastic baskets came from the Dollar Tree and they just sit on the 'prongs' to hold tons of stuff. I used to have this rack in the closet of my old craft room and believe me I had that baby loaded down. I did notice one of the welds had broken at the bottom. I think I'll be kinder to it now and not load it down so much. Hum.... what to save....hoard? I mean.. I've got what... six bucks in it. I just love it and couldn't part with it. I've got the red fabric covers held up with binder clips and curtain hooks. I didn't finish the edges because I'm not sure I like all the red. I may go to unbleached sheeting and see how I like that.

Now you see the rest of the story. The shelves are holding a lot of the things that were in the closet and on shelves of my old craft room. I've still got some things missing. (Going crazy looking for them too.) More recycling is here. My hubby picked up these whopper sized onion crates at a grocery store. They are strong and slide out like a drawer. They have a cute printed label on the ends that say "Oso Sweet" with a mountain scene. You may be able to click for a larger view. I just love these crates. I also have two under the computer table. I've got them flipped over so I can sit things on them until I can figure out some other type of storage. I love recycling or re-purposing things so crates have been a staple in my craft rooms for many years. I have four cantaloupe crates serving as shelves sitting under a window now. (Next to the fabric file cabinet.) I don't think my organizing is very "organized" but it's a work in process.

We'll see how it goes. I like the shelves covered, but I like easy access too.
Well... I know I'm a lazy blogger but I just do whatever I feel like doing. I am spoiled ya know!I've got lots more to share but it's time to stamp while I have the energy. (I could use some chocolate about right now!)
Better go before my computer freezes up. (Happens all the time now.)
Thanks so much for stopping by!
Have a great day!
Debbie

Saturday, July 4, 2009

June projects for Sunday International

Tis is my fruit card. You can't see it in the photo, but all the little fruits are cut individually and attached with pop-dots for added dimension. Second photo, is a simple recipe card. I made several to include in the Red Recipe Card holder box.
Third and fourth photos are the Red Recipe Card holder box that I made.


Hey bloggers!

Can you believe it's July 4th? Where did the first of this year go? I know it's been a blur to me.

June was a whirlwind of activities for us. My dream craft house came true and I've been enjoying getting it organized. Far from being done, but it's coming along.

So... let me know what you think about my projects.

Have a great evening and thanks so much for visiting!

Debbie

Happy 4th of July

I've been having so much fun in my new Craft House. I can't focus too well because I'm still in shock and awe that I have it.

We're having an easy, laid-back kind of day today. We cooked on the grill last night with Scarlett helping. Today... we'll eat leftovers.

Today turned out to be a great day to me. I bumped into some friends at Wal-Mart that I used to work with. (Hey Waneda and Bruce!) I could have talked to them all day. They had wandered into my neck of the woods and I just couldn't believe it when I saw Waneda. She was always a joy to work with. That's the sad part of leaving a company that you spent 26 years at. Your friends. Cherished memories...Sharing our lives with each other. Waneda and I shared a lot of crafty things together. She's a fabulous painter and can create some cool things. (Girl.... I sure do miss our chats about crafts!)

Bruce.... helped me to create this hugh stash of paper that I have. (Thanks Bruce for being there when I wanted paper cut to size.) I still have a ton of paper from the old days. A stamper can never have too much paper.

As always, thanks so much for visiting.

Take care,
Debbie

Monday, June 29, 2009

Dream Craft House Inside Update

See the cute flowers in the old rusty milk can. I've had that milk can for maybe 20 years. It's so heavy, it's hard to move around. Yeah... check out that cable wire going across the front. The cable guy came today and ran that line to hook up my computer. I love having the computer in the craft house now.

I hope you're ready for a visit inside my craft house. I've been busy making curtains today and hanging them on the curtain rods that took me forever to put up. I'm getting pretty good at using a cordless drill.
Here ya go... come on it and see what I've done today. This is the computer center just to the left of the entrance. The red skirt is what I made yesterday.
This is just a different view of the computer center. My Cricut Expression is on the left of the table. I wanted it close to the computer so I can use the Design software that can be used with the Cricut. (That's a whole other story.) Let's put it this way.... I don't know how to use it very well, but I'm learning.Next picture is just panning from the left on around the room. The metal file cabinet was a great find for $20 at the Habitat for Humanity Re-Store. The antique sewing machine is from a friend who is another 'great find.' (Thanks Deirdre!)
This wonderful spot is my fun zone! There's the $30 desk from the Re-Store. This is Scarlett's fun zone. She's got a bunch of beautiful cards to hang on her bulletin board. She doesn't know the refrigerator is in here. It's a gift from some dear friends. It's holding some bottled water for now. (Thanks Jim and Rita!)
Okay.. I've taken you in a full circle around the room. What do you think about it? Don't you think it's just a cool creative space? I know I'm ready to start stamping. How do you like that skirt around the center work table? Can you see the little curtain rods that hold the skirts? They were just about $3 each.
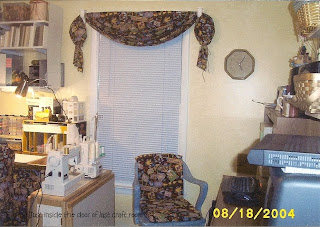
Okay... one more view. This is from my desk looking at the television and the door. (Yep... I really hung that television up myself.) No easy task but I figured it out.
Now... what do you think of my wonky curtains? There was no sewing involved. I was just too tired to sew anything else. It's about three yards just draped over the rod. Looks okay to me. I bought way too much red fabric so I thought this would be a good way to use it up.

I sure hope you've enjoyed the tour. The next journey has just begun. I feel my mojo calling out.... it's saying "It's crafting time!"
Thanks so much to everyone that has shown an interest in my journey. Stay with me and you'll see what happens next.
Thanks for visiting and have a great night!
Debbie